Home

A Python module for scientific analysis of 3D objects and point clouds based on VTK and NumPy.
Check out the GitHub repository and the vedo main page.
Install and Test
pip install vedo

# Or, install the latest development version with:
pip install -U git+https://github.com/marcomusy/vedo.git
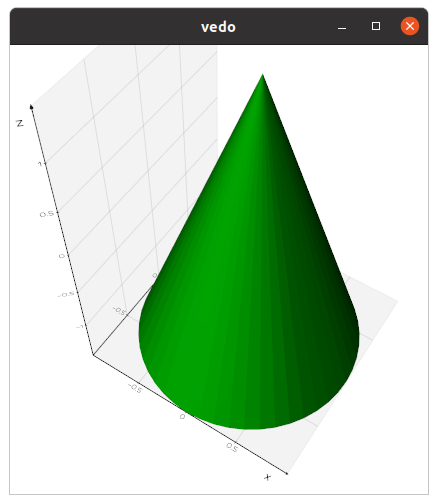
import vedo
vedo.Cone().show(axes=1).close()
Command Line Interface
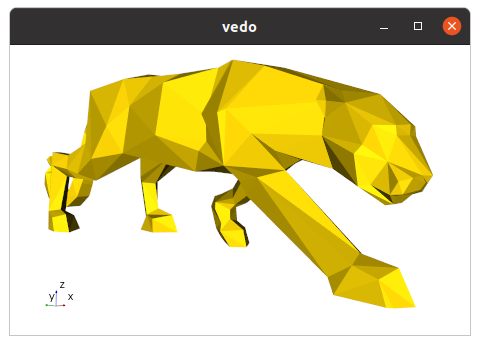
The library includes a Command Line Interface. For example, type in your terminal:
vedo --help
vedo https://vedo.embl.es/examples/data/panther.stl.gz
vedo https://vedo.embl.es/examples/data/panther.stl.gz --output panther.png
You can also render non-interactively from the terminal and write the result directly to disk:
vedo bunny.obj --output bunny.png
vedo volume.tif -g --output volume.png --offscreen --scale 2
vedo scene.npz --output scene.html --backend threejs
Pressing h will then show a number of options to interact with your 3D scene:
   i     print info about the last clicked object
   I     print color of the pixel under the mouse
   Y     show the pipeline for this object as a graph
   <- -> use arrows to reduce/increase opacity
   x     toggle mesh visibility
   w     toggle wireframe/surface style
   l     toggle surface edges visibility
   p/P   hide surface faces and show only points
   1-3   cycle surface color (2=light, 3=dark)
   4     cycle color map (press shift-4 to go back)
   5-6   cycle point-cell arrays (shift to go back)
   7-8   cycle background and gradient color
   09+-  cycle axes styles (on keypad, or press +/-)
   k     cycle available lighting styles
   K     toggle shading as flat or phong
   A     toggle anti-aliasing
   D     toggle depth-peeling (for transparencies)
   U     toggle perspective/parallel projection
   o/O   toggle extra light to scene and rotate it
   a     toggle interaction to Actor Mode
   n     toggle surface normals
   r     reset camera position
   R     reset camera to the closest orthogonal view
   .     fly camera to the last clicked point
   C     print the current camera parameters state
   X     invoke a cutter widget tool
   S     save a screenshot of the current scene
   E/F   export 3D scene to numpy file or X3D
   q     return control to python script
   Esc   abort execution and exit python kernel
Some useful bash aliases
alias vr='vedo --run '      # to search and run examples by name
alias vs='vedo --search '   # to search for a string in examples
alias ve='vedo --eog '      # to view single and multiple images
Learning Resources
You are welcome to ask specific questions on the image.sc forum, open a GitHub issue or search the examples gallery for some relevant example.
You can also find online tutorials at:
-
Vedo tutorial for the EMBL Python User Group with slides by M. Musy (EMBL).
-
Summer School on Computational Modelling of Multicellular Systems with slides by Laura Avinyo (EMBL).
-
YouTube video tutorials by M. El Amine:
- Visualizing Multiple 3D Objects in Medical Imaging
- Capture 3D Mesh Screenshots in Medical Imaging
- Slice 'n Dice: Precision 3D Mesh Cutting
-
Creating an interactive 3D geological model by A. Pollack (SCRF). See a more recent example here.
-
"vedo", a python module for scientific analysis and visualization of 3D data, I2K Conference, by M. Musy (EMBL).
Export a 3D scene to file
You can export to a vedo file (a standard numpy file) by pressing E
in your 3D scene. You can then interact with it normally, for example using the key bindings shown above.
Another option is to export to a template HTML web page by pressing F with the x3d backend.
You can also export programmatically in k3d format from a Jupyter notebook.
From the CLI you can export without opening an interactive window using --output.
Supported image outputs include .png, .jpg, .pdf, .svg and .eps.
Supported scene outputs include .npy, .npz, .x3d and .html.
vedo bunny.obj --output bunny.png
vedo bunny.obj --output bunny.pdf
vedo scene.npz --output exported_scene.x3d
vedo scene.npz --output exported_scene.html --backend threejs
Use --offscreen explicitly for headless environments, and --scale to increase screenshot resolution:
vedo bunny.obj --output bunny.png --offscreen --scale 2
File format conversion
You can convert on the fly a file (or multiple files) to a different format with
vedo --convert bunny.obj --to ply
Running in a Jupyter Notebook
To use vedo in Jupyter notebooks, set vedo.settings.default_backend = "...".
The supported backends are:
2d, the default. A static image is generated.vtk, in this case a normal graphics rendering window will pop up.- k3d, use with
pip install k3d. - ipyvtklink (allows interaction with the scene).
- trame, use with
pip install trame trame-vtk trame-vuetify.
Check for more examples in the repository.
Running on Google Colab
Start your notebook with:
import vedo
vedo.init_colab()
Then test it with:
import vedo
print("vedo", vedo.__version__)
sphere = vedo.Sphere().linewidth(1)
plt = vedo.Plotter()
plt += sphere
plt.show(axes=1, viewup='z', zoom=1.5)
Running on a Server
-
Install
libgl1-mesaandxvfbon your server:sudo apt install libgl1-mesa-glx libgl1-mesa-dev xvfb pip install vedo -
Either start Xvfb from Python before rendering:
import vedo vedo.start_xvfb() -
Or execute the equivalent on startup via bash:
set -x export DISPLAY=:99.0 which Xvfb Xvfb :99 -screen 0 1024x768x24 > /dev/null 2>&1 & sleep 3 set +x exec "$@" -
You can save the above startup script as
/etc/rc.localand usechmod +xto make it executable. If it reports an error during startup, test it with, e.g.:import vedo plt = vedo.Plotter(offscreen=True, size=(500,500)) plt.show(vedo.Cube()).screenshot('mycube.png').close()
Running in a Docker container
You need to set everything up for offscreen rendering. There are two main requirements:
vedoshould be set to render in offscreen mode.-
The guest OS in the Docker container needs the relevant libraries installed (in this example we need the Mesa openGL and GLX extensions, and Xvfb to act as a virtual screen. It may also be possible to use the OSMesa offscreen driver directly, but that requires a custom build of VTK).
-
Create a
Dockerfile:FROM python:3.8-slim-bullseye RUN apt-get update -y \ && apt-get install libgl1-mesa-dev libgl1-mesa-glx xvfb -y --no-install-recommends \ && apt-get purge -y --auto-remove -o APT::AutoRemove::RecommendsImportant=false \ && rm -rf /var/lib/apt/lists/* RUN pip install vedo && rm -rf $(pip cache dir) RUN mkdir -p /app/data WORKDIR /app/ COPY test.py set_xvfb.sh /app/ ENTRYPOINT ["/app/set_xvfb.sh"] -
set_xvfb.sh:#!/bin/bash set -x export DISPLAY=:99.0 Xvfb :99 -screen 0 1024x768x24 > /dev/null 2>&1 & #sleep 3 set +x exec "$@" -
test.py:from vedo import Sphere, Plotter, settings sph = Sphere(pos=[-5, 0, 0], c="r") plt = Plotter(interactive=False, offscreen=True) plt.show(sph) plt.screenshot("./data/out.png", scale=2).close()
Then you can:
$ docker build -t vedo-test-local .$ docker run --rm -v /some/path/output:/app/data vedo-test-local python test.py(directory/some/path/outputneeds to exist)- There should be an
out.pngfile in the output directory.
Generate a single executable file
You can use pyinstaller to generate a single portable executable file for different platforms.
Write a file myscript.spec as:
# -*- mode: python ; coding: utf-8 -*-
#
import os

import sys
sys.setrecursionlimit(sys.getrecursionlimit() * 5)

from vedo import installdir as vedo_installdir
vedo_fontsdir = os.path.join(vedo_installdir, 'fonts')
print('vedo installation is in', vedo_installdir)
print('fonts are in', vedo_fontsdir)

block_cipher = None

added_files = [
    (os.path.join('tuning','*'), 'tuning'),
    (os.path.join(vedo_fontsdir,'*'), os.path.join('vedo','fonts')),
]

a = Analysis(['myscript.py'],
             pathex=[],
             binaries=[],
             hiddenimports=[
                 'vtkmodules',
                 'vtkmodules.all',
                 'vtkmodules.util',
                 'vtkmodules.util.numpy_support',
                 'vtkmodules.qt.QVTKRenderWindowInteractor',
             ],
             datas = added_files,
             hookspath=[],
             hooksconfig={},
             runtime_hooks=[],
             excludes=[],
             win_no_prefer_redirects=False,
             win_private_assemblies=False,
             cipher=block_cipher,
             noarchive=False)
pyz = PYZ(a.pure, a.zipped_data,
             cipher=block_cipher)
exe = EXE(pyz,
          a.scripts,
          a.binaries,
          a.zipfiles,
          a.datas,
          [],
          name='my_program_name',
          debug=False,
          bootloader_ignore_signals=False,
          strip=False,
          upx=True,
          upx_exclude=[],
          runtime_tmpdir=None,
          console=True,
          disable_windowed_traceback=False,
          target_arch=None,
          codesign_identity=None,
          entitlements_file=None)
pyinstaller myscript.spec
If you get an error message related to a font that is not shipped with vedo, copy the .npz and .ttf files to vedo/fonts (where the other fonts are) and reinstall vedo.
Then add in your script settings.font_parameters["FONTNAME"]["islocal"] = True.